Durlags Tower How to Open Door 3 Again
Earlier you set foot in this tower exist aware that there are traps galore found throughout, especially in the lower labyrinth levels below the tower. Nearly every container is trapped as well. It might be a prudent idea to reserve a party slot for a thief or one of its variants with aplenty thieving skills to sniff out and deal with the danger ahead.
Contents
- 1 Outside (AR0500)
- 1.ane Basilisks
- ii The Tower Floors
- 2.1 Ground Floor (AR0502)
- 2.ii 2d Floor (AR0503)
- 2.3 3rd Floor (AR0503)
- 2.iii.1 Daital
- two.3.2 Riggilo
- 2.4 Fourth Floor (AR0504)
- 2.4.1 Kirinhale
- two.v Cellar (AR0501)
- 3 The Lower Labyrinth Levels
- 3.1 Labyrinth Level One (AR0511)
- 3.ane.1 The Four Warders
- 3.2 Labyrinth Level Two (AR0512)
- 3.2.one The Doors
- three.2.2 Traps
- iii.3 Labyrinth Level 3 (AR0513)
- iii.3.1 The Four Elemental Challenges
- 3.3.2 The Chessboard
- three.4 Labyrinth Level Four (AR0514)
- three.4.i The Compass Room
- three.iv.2 The Demon Knight
- 3.1 Labyrinth Level One (AR0511)
- 4 Bugs
- 5 Meet as well
Outside (AR0500) [ ]
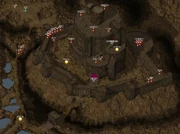
Outside
When you lot arrive at the tower the first person you'll come across is Erdane, He'south a merchant that has items for sale, some of which are quite useful in the exploration of the tower. The toughest enemy encountered on the outer grounds of the belfry are a pair of Battle Horrors. Doppelgangers, Skeletons, a Doom Baby-sit and another Battle Horror are also lurking about the grounds, mostly upon the inner wall surrounding the tower. A high value particular, Rashad's Talon is located in a nook on a chimney pipe that is located on the rooftop.
Basilisks [ ]
On the 2d floor of the tower, one of the corridors ends with an leave to the roof. Be aware that in that location is a Lesser Basilisk waiting when you go out the door. Three Greater Basilisks are found on the meridian roof level. A Potion of Mirrored Eyes may non terminal long enough, pending your speed and luck in battle. Since Protection From Petrification in its various forms lasts at minimum of 1 hour, this is the better choice.
The Tower Floors [ ]
Ground Floor (AR0502) [ ]
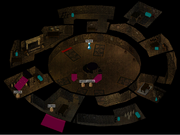
Ground Floor
If yous are taking Ike's guided tour of the tower, continue talking to him until he tries to sell you lot a wardstone. Whether yous have or decline it, the Demon Knight volition announced and unleash a couple of Fireball spells on Ike, the tourist's, and whatever party fellow member located in the wrong spot and and then teleport away. It is impossible to kill the Demon Knight at this signal. The just flooring trap on this level is in the doorway to the left of the skeleton. This is a silent trap that is only activated when one of the tourists sets information technology off.
2d Flooring (AR0503) [ ]
2nd Floor
There are no notable NPC's on this floor though there are numerous items yous can collect. The simply enemies are half-dozen ghasts which may exist tough to defeat depending on your level. There are several floor traps too.
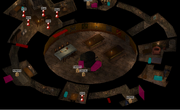
Tertiary Flooring (AR0503) [ ]
Third Flooring
There are two NPC'due south on this flooring; Daital and Riggilo. There are no floor traps on this level, but in that location are numerous items you tin collect including a Tome of Understanding.
Daital [ ]
Daital is a specter who tin can be found in the medical room. He will mistake you lot for the onetime master of the belfry and volition summon an Invisible Stalker and cast Chaos when he turns hostile. This may exist a tough battle but results in 6750 XP.
Riggilo [ ]
In the bedroom is Riggilo. He will talk to you upon sight. If you annoy him he volition attack otherwise he'll remain neutral.
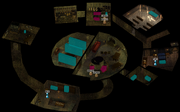
4th Flooring (AR0504) [ ]

Fourth Flooring
This is the final flooring of the tower. The merely NPC is Kirinhale. At that place are no floor traps on this level, but once again there are still numerous items you tin can collect.
Kirinhale [ ]
Kirinhale can be found in her room. She is desperate to escape the belfry and will give you a take chances to help her. You tin can pass up her asking, in which case she will attack, or offer to assistance her out of her predicament. She too carries the Staff Spear.
Cellar (AR0501) [ ]
Cellar
The only NPC is Bayard and the only enemies are v ghasts. There are several floor traps too. A secret door will become visible while exploring the cellar and this leads to the lower labyrinth levels beneath the tower.
The Lower Labyrinth Levels [ ]
Exploring the tower'south lower levels tells the story of the dwarven hero Durlag Trollkiller and is much harder to consummate than the upper floors. In that location are plenty of potions, ammo, coin, and nifty artifacts to obtain hither, only doing and then without disarm and unlock skills tin can exist quite challenging. There are dozens of flooring traps to locate and disarm. The vast majority of containers are trapped and locked as well.
This area is not for the faint of heart or those of low level. Y'all have been warned.
Note: Throughout the dungeons beneath the belfry magical wardstones are required to travel between some levels, open up specific doors, or perform other functions. They are considered gems and therefore can exist stored in a Gem Pocketbook.
Labyrinth Level 1 (AR0511) [ ]
Labyrinth Level 1
This first labyrinth level below the tower has one principal objective which is to solve the riddles of The Four Warders. The level contains numerous floor traps and trapped containers. One high value item to be plant is The Practical Defense force, a magical set of armor originally endemic by Durlag's father, Bolhur Thunderaxe. Enemies of annotation include Greater Doppelgangers, Mustard Jellys, Skeleton Warriors, and a Flesh Golem. The only mode to exit the level and accelerate to the next level is by having the Level 1 Exit Wardstone in your possession.
The Iv Warders [ ]
The four warders correspond weaknesses of the warrior: Forehandedness, Fearfulness, Love, and Pride. Each is a riddle that must be solved by exploring the level and performing certain actions to proceeds an agreement of how they relate to horror'southward Durlag's had to confront.
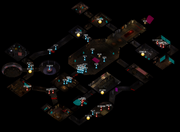
Labyrinth Level Ii (AR0512) [ ]
Labyrinth Level 2
This level is where information technology actually gets fun...and confusing. At that place are numerous doors, some of which are warded and require specific actions to be undertaken to open them. Magical wardstones too play an of import function in the exploration of this level. Notable NPCs include Durlag and his family: Islanne, Fuernebol, and Kiel the Legion Killer, although they may not be who you lot retrieve they are. Flooring traps, some of which are silent, are everywhere. Among the high value items to be institute are the possessions of Kiel which include his: helmet, morning star, and buckler. Ghasts and Dwarven Doom Guards are merely some of the enemies that are encountered. The only way to exit the level and accelerate to the adjacent level is by having the Level two Go out Wardstone in your possession.
The Doors [ ]
Locked and warded doors are found throughout and can make navigating this level quite frustrating. And by opening sure doors, others that were already opened just might shut. Several different wardstones can aid in opening some of the initial doors that the party will come across and can help in easing the way forwards. And once the party has reached the switch room information technology becomes much easier to open up and close a skilful number of these doors.
Traps [ ]
The level contains numerous flooring traps and several of them are silent. Triggering these silent traps will atomic number 82 to the spawning of Greater Doppelgangers in the guise of Durlag and his family unit, or even in their true doppelganger form. A long passageway contains many of these traps that, when tripped, will unleash multiple ghasts upon the party. Trapped containers are as well found in many of the rooms on this level.
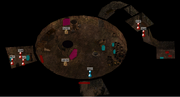
Labyrinth Level 3 (AR0513) [ ]

Labyrinth Level 3
This level of the dungeon beneath the tower doesn't have many rooms but what information technology lacks in rooms it makes upward for in the difficulty of completing the level and moving on the the next. Three initial rooms each present unique challenges that will examination the party in dissimilar ways. Enemies in these different rooms include Greater Wyverns, Skeletons that shoot magical arrows, and invisible Ashirukurus that tin can kill a party member with one backstab. The level besides contains four elemental challenges, each in its own separate area, which must exist completed to accelerate to the chessboard. It seems Durlag enjoyed the age old game of chess and the challenges information technology can present in winning the game. Killing the King piece will allow the political party to advance to the side by side level of the dungeon. Floor traps are numerous. High value items include the Wizard Slayer and The Earth's Edge.
The Four Elemental Challenges [ ]
These four areas each contain a specific blazon of "elemental" foe that must be defeated. The four elements these foes represent include: fire (Phoenix Baby-sit), ice (Kaldran the Bear), slime (Fission Slime), and air current (Air Attribute). The instant the last challenge is completed the party will be immediately teleported to the chessboard.
The Chessboard [ ]
Here the party will observe itself arrayed behind all the pieces of a typical chessboard. An ethereal voice volition provide basic rules which you should follow closely every bit failure to obey said rules will lead to an electrical avalanche of lightning bolts unleashed upon the party.
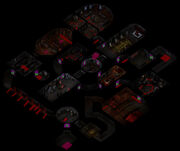
Labyrinth Level Four (AR0514) [ ]

Labyrinth Level 4
This is the last dungeon level beneath the tower. The specters of Durlag and Islanne can be establish on this level. He will provide yous with vague clues as to what must be achieved on this level to proceeds understanding about his predicament and why he still haunts this place. She volition provide a quick fashion to exit the level and return to the exterior world. Exploration of this level reveals a statue that will speak to y'all, a room with a carpet that tin brand the party'south journey to the afterlife a quick reality, and a huge cavern of slime filled with Greater Ghouls. And finally, when the riddles of the compass room have been solved, a showdown with the Demon Knight will be your final task. Notable NPCs include the greater ghoul Grael,Clair De'Lain, and the young charlatan Dalton, who'south discovery and release will lead towards the completion of a side quest. Numerous high value items are constitute on this level including: The Burning Globe, a Staff of Hitting, Pellan'south Shield, Krotan's Skullcrusher, Arla's Dragonbane, Karajah's Life and Decease and a Cloak of the Shield. Difficult enemies, besides those already mentioned, include a couple of Helmed Horrors and a Astral Phase Spider.
The Compass Room [ ]
Exploration of the level volition reveal sure rooms which contain specific items, that when clicked on, will teleport the party to a circular room with four stone golems. The only way to leave is to correctly reply the riddle posed by one of the golems. Speaking with all iv volition provide clues to the answer of each riddle. The party will be teleported here a full of three times. After the third fourth dimension, speak with Durlag's specter in the hallway and he will lead the party to a warded door, which when opened, leads to the last of Durlag'south many throne rooms beneath the tower.
The Demon Knight [ ]
When you enter this final throne room, Clair De'Lain will immediately hail the party. She will describe the horrors she and her group of fellow adventurers encountered when they attempted to face the Demon Knight. This is the toughest of all the battles fought past the party. Exist prepared for the spells cast past the evil entity and the possibility of having to fight a indistinguishable of every member of the party. The Demon Knight has a Helmet of Opposite Alignment and the Soultaker Dagger in his possession. The dagger is needed to finish the Recovering "Soultaker" quest. Killing the Demon Knight will consummate your exploration of Durlag'due south Tower.
Bugs [ ]
- In the panel release of the Enhanced Edition, information technology is currently impossible to return to the chessboard and thus also to labyrinth level four. Players are advised to become in that location with minimal inventory and clear the unabridged floor on their get-go visit, conveying out anything they intend to have out with them. -- This issues is fixed as of version 2.vi.six.0. (Non yet remedied for the Nintendo Switch ver. one.0.4)
See also [ ]
- Durlag's Tower (treasure)
feldmanwoundescous.blogspot.com
Source: https://baldursgate.fandom.com/wiki/Durlag%27s_Tower_Walkthrough
0 Response to "Durlags Tower How to Open Door 3 Again"
Post a Comment